www.e34.hu

  • Történelem
  • Szervíz
  • Típusok – verziók
  • Blog
  • Galéria
    • 18zoll
    • rhantos
    • apapamaci
    • m5motosport
    • komárom
    • királyrét
    • lurdy
  • Kapcsolat

Xenon beépítés után az LKM (Licht Kontrol Modul) átalakítása


andre@e34.net nyomán fordította és kiegészítette: alpha © 2004


Probléma: Ha utólagosan Xenon kerül beépítésre a H1-es foglalat helyére, akkor a Check-Controll-lal felszerelt autóknál az Abblendlicht defekt felirat jelenik meg a kijelzőn minden indítás után.


Magyarázat: A hibát kiváltó ok az, hogy a Xenon vezérlője más ellenállással rendelkezik mint egy H1-es izzó, ezért amikor gyújtás ráadásakor az LKM ellenőrzi a tompított fényszórót és a hátsó ködlámpát, akkor a Xenon vezérlő alacsonyabb ellenállása hibaként jelentkezik, amely a kijelzőn is megjelenítésre kerül, ami hosszú távon elég idegesítő tud lenni.


Cél: A fenti hibajelenség eliminálása a Lichtkontrollmodul –továbbiakban LKM– megfelelő átalakításával.


Szükséges eszközök:

  • LKM (autó tartozéka)
  • rézvezeték (kb. 8-10cm hosszú)
  • forrasztópáka
  • forrasztóón
  • ragasztós hőpisztoly
  • szike


Átalakítás:

Az LKM a motortérben, a biztosítékdobozban található a vezetőoldalon. Vegyük ki a vezérlőt és szereljük szét úgy, hogy a nyák hátoldala legyen felénk.


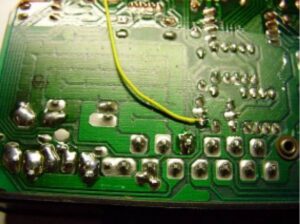
A sárga vezetéket kell a piros nyilakkal jelölt helyekre forrasztani. A kábelt át kell vezetni a másik oldalra, mivel az egyik forrasztás az egyik oldalon, a másik az ellentétes, a beültetési oldalon található. Az átvezetést a nyák felső részénél lévő kis kivágásnál érdemes megvalósítani.

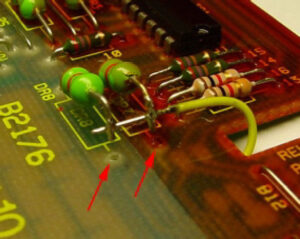
Továbbá a beültetési oldalon található két ellenállás egyik lábát ki kell forrasztani


A piros körrel jelölt helyen három áramkört meg kell szakítani, és egy újat kell kialakítani.


Ehhez ad segítséget az alábbi sematikus kapcsolási rajz.


Az áramkörök megszakításához használjuk fel a szikét, és egyszerűen vágjuk át a vezető réteget a pengével. Miután átvágtuk kontaktusellenőrzővel még egyszer ellenőrizzük le, hogy valóban nem folyik-e áram a két pont között az áramkörben.

Az LKM beültetési oldalán most ellenőrizzük, hogy valóban nincsen kontaktus a nyák és az ellenállások között. Az ellenállásokat nyugodtan hajlítsuk egy kicsit felfelé és a kiforrasztott pontokat műgyantás ragasztóval tömítsük el.

Az alábbi képeken is látszik, hogy a vezetéket az ellenállás mindkét lábához hozzá kell forrasztani.


Ha ezzel kész vagyunk, akkor nincs is semmi más hátra, minthogy visszarakjuk az LKM-et a biztosítékdobozba és kipróbáljuk a Xenont! Ha most nem ír ki Abblendlicht defekt hibajelzést akkor elégedettek lehetünk, összeszerelhetjük az LKM-et és a biztosítékdobozt.


Az egész művelet időigénye kb. 30 perc.

    CyberChimps WordPress Themes

    www.e34.hu
    We use cookies on our website to give you the most relevant experience by remembering your preferences and repeat visits. By clicking “Accept All”, you consent to the use of ALL the cookies. However, you may visit "Cookie Settings" to provide a controlled consent.
    Cookie SettingsAccept All
    Manage consent

    Privacy Overview

    This website uses cookies to improve your experience while you navigate through the website. Out of these, the cookies that are categorized as necessary are stored on your browser as they are essential for the working of basic functionalities of the website. We also use third-party cookies that help us analyze and understand how you use this website. These cookies will be stored in your browser only with your consent. You also have the option to opt-out of these cookies. But opting out of some of these cookies may affect your browsing experience.
    Necessary
    Always Enabled
    Necessary cookies are absolutely essential for the website to function properly. These cookies ensure basic functionalities and security features of the website, anonymously.
    CookieDurationDescription
    cookielawinfo-checkbox-analytics11 monthsThis cookie is set by GDPR Cookie Consent plugin. The cookie is used to store the user consent for the cookies in the category "Analytics".
    cookielawinfo-checkbox-functional11 monthsThe cookie is set by GDPR cookie consent to record the user consent for the cookies in the category "Functional".
    cookielawinfo-checkbox-necessary11 monthsThis cookie is set by GDPR Cookie Consent plugin. The cookies is used to store the user consent for the cookies in the category "Necessary".
    cookielawinfo-checkbox-others11 monthsThis cookie is set by GDPR Cookie Consent plugin. The cookie is used to store the user consent for the cookies in the category "Other.
    cookielawinfo-checkbox-performance11 monthsThis cookie is set by GDPR Cookie Consent plugin. The cookie is used to store the user consent for the cookies in the category "Performance".
    viewed_cookie_policy11 monthsThe cookie is set by the GDPR Cookie Consent plugin and is used to store whether or not user has consented to the use of cookies. It does not store any personal data.
    Functional
    Functional cookies help to perform certain functionalities like sharing the content of the website on social media platforms, collect feedbacks, and other third-party features.
    Performance
    Performance cookies are used to understand and analyze the key performance indexes of the website which helps in delivering a better user experience for the visitors.
    Analytics
    Analytical cookies are used to understand how visitors interact with the website. These cookies help provide information on metrics the number of visitors, bounce rate, traffic source, etc.
    Advertisement
    Advertisement cookies are used to provide visitors with relevant ads and marketing campaigns. These cookies track visitors across websites and collect information to provide customized ads.
    Others
    Other uncategorized cookies are those that are being analyzed and have not been classified into a category as yet.
    SAVE & ACCEPT